When my friend, Teresa, from Blooming on Bainbridge mentioned that she loves Frosted Animal Cookies, a little light bulb went off in my head. {PS...if you've never visited Teresa's blog, go now...they say Disney World is the happiest place on earth; they're wrong. It's Teresa's blog.}Why not make my own *larger* version of them?
See, I love Mother's Frosted Animal Cookies. When kiddo was a toddler, I lived on a diet of
Mother's Frosted Animal Cookies and Vanilla Coke. Then I weaned myself off of them and started my current diet of Starbucks Pumpkin Bread and Iced Decaf Vanilla Lattes. Much healthier.
I didn't have all of the correct shapes for the cookies; I did have an elephant cutter, but the rest, well...I improvised.
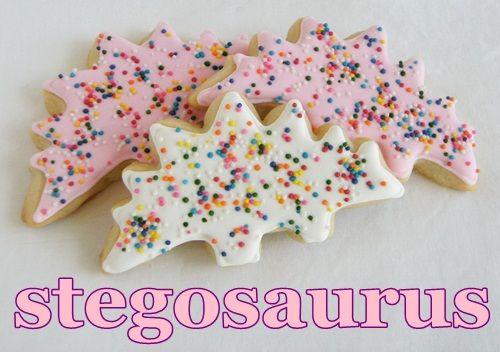
We have frosted animal bunnies, ducks, giraffes....
....and the all-important frosted animal stegosaurus.
For the flavor, I wanted to be authentic. So, I checked a bag of Mother's Cookies to see what flavor they used to make them so delicious. Vanilla? Almond? Lemon? Butter? Turns out, what makes them so delicious is just plain ol' sugar. I couldn't find any flavoring in the ingredients whatsoever.
Or maybe it's the sprinkles.
So here is my not-so-authentic version:
Lemon Cut-Out Cookies3 c. unbleached flour
2 tsp. baking powder
1 c. sugar
2 sticks salted butter
1 egg
1/2 tsp. vanilla
1/2 tsp. fresh lemon juice
3/4 tsp. grated lemon zest
Preheat oven to 350.
In a medium bowl, whisk together the flour and baking powder. Set aside.
With the paddle attachment of an electric mixer, beat together the sugar and cold butter until fluffy. Add in the egg, vanilla, lemon juice and zest. Beat until combined.
On low speed, add in the flour mixture in 3 additions. Scrape the bottom of the bowl as necessary. Knead together the dough as needed by hand as it will be very stiff.
Roll out on a floured surface and cut into shapes about 3/8 to 1/4" thick. Place on parchment lined sheets. Freeze 5-10 minutes on the sheets before placing in the oven (this will help prevent cookies from spreading).
Bake 9-12 minutes, depending on cookie cutter size. Transfer cookies to a cooling rack and let cool completely.
Lemon Royal Icing4 TBSP meringue powder
scant 1/2 c. water
1 lb. powdered sugar
1/2 tsp light corn syrup
1 tsp. fresh lemon juice
Combine the meringue powder and water. With the
paddle attachment of an electric mixer, beat until combined and foamy.
Sift in the powdered sugar and beat on low to combine.
Add in the corn syrup and lemon juice
Increase speed to med-high and beat for about 5-10 minutes, just until the icing is glossy and stiff peaks form. (You should be able to remove the beater from the mixer and hold up and jiggle without the peak falling.) Do not overbeat.
Cover with plastic wrap touching the icing or divide and color using gel paste food colorings. (I used
AmeriColor Gel Paste Food Color in Bright White and Deep Pink.)
Remember last week when I visited my friend Cheryl from
TidyMom? She wrote a
great post about our visit. Even though it was our first time to meet, I felt like I had known her for AGES! We talked from the second I stepped off the plane until the second she dropped me back off at the airport.
Cheryl is just what she is on her blog....fun, funny, creative, smart, beautiful...I'm so thrilled to be her friend. She also has an adorable husband and 2 beautiful girls! (AND, her cupcakes are delicious!)
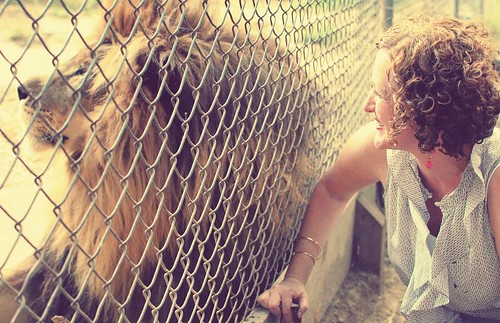
Oh yeah, I also bottle fed a 750-pound lion.
If you have a bloggy friend, I highly recommend making the effort to get together in
REAL LIFE!
Posted by admin
When my friend, Teresa, from Blooming on Bainbridge mentioned that she loves Frosted Animal Cookies, a little light bulb went off in my head. {PS...if you've never visited Teresa's blog, go now...they say Disney World is the happiest place on earth; they're wrong. It's Teresa's blog.}Why not make my own *larger* version of them?
See, I love Mother's Frosted Animal Cookies. When kiddo was a toddler, I lived on a diet of
Mother's Frosted Animal Cookies and Vanilla Coke. Then I weaned myself off of them and started my current diet of Starbucks Pumpkin Bread and Iced Decaf Vanilla Lattes. Much healthier.
I didn't have all of the correct shapes for the cookies; I did have an elephant cutter, but the rest, well...I improvised.
We have frosted animal bunnies, ducks, giraffes....
....and the all-important frosted animal stegosaurus.
For the flavor, I wanted to be authentic. So, I checked a bag of Mother's Cookies to see what flavor they used to make them so delicious. Vanilla? Almond? Lemon? Butter? Turns out, what makes them so delicious is just plain ol' sugar. I couldn't find any flavoring in the ingredients whatsoever.
Or maybe it's the sprinkles.
So here is my not-so-authentic version:
Lemon Cut-Out Cookies3 c. unbleached flour
2 tsp. baking powder
1 c. sugar
2 sticks salted butter
1 egg
1/2 tsp. vanilla
1/2 tsp. fresh lemon juice
3/4 tsp. grated lemon zest
Preheat oven to 350.
In a medium bowl, whisk together the flour and baking powder. Set aside.
With the paddle attachment of an electric mixer, beat together the sugar and cold butter until fluffy. Add in the egg, vanilla, lemon juice and zest. Beat until combined.
On low speed, add in the flour mixture in 3 additions. Scrape the bottom of the bowl as necessary. Knead together the dough as needed by hand as it will be very stiff.
Roll out on a floured surface and cut into shapes about 3/8 to 1/4" thick. Place on parchment lined sheets. Freeze 5-10 minutes on the sheets before placing in the oven (this will help prevent cookies from spreading).
Bake 9-12 minutes, depending on cookie cutter size. Transfer cookies to a cooling rack and let cool completely.
Lemon Royal Icing4 TBSP meringue powder
scant 1/2 c. water
1 lb. powdered sugar
1/2 tsp light corn syrup
1 tsp. fresh lemon juice
Combine the meringue powder and water. With the
paddle attachment of an electric mixer, beat until combined and foamy.
Sift in the powdered sugar and beat on low to combine.
Add in the corn syrup and lemon juice
Increase speed to med-high and beat for about 5-10 minutes, just until the icing is glossy and stiff peaks form. (You should be able to remove the beater from the mixer and hold up and jiggle without the peak falling.) Do not overbeat.
Cover with plastic wrap touching the icing or divide and color using gel paste food colorings. (I used
AmeriColor Gel Paste Food Color in Bright White and Deep Pink.)
Remember last week when I visited my friend Cheryl from
TidyMom? She wrote a
great post about our visit. Even though it was our first time to meet, I felt like I had known her for AGES! We talked from the second I stepped off the plane until the second she dropped me back off at the airport.
Cheryl is just what she is on her blog....fun, funny, creative, smart, beautiful...I'm so thrilled to be her friend. She also has an adorable husband and 2 beautiful girls! (AND, her cupcakes are delicious!)
Oh yeah, I also bottle fed a 750-pound lion.
If you have a bloggy friend, I highly recommend making the effort to get together in
REAL LIFE!
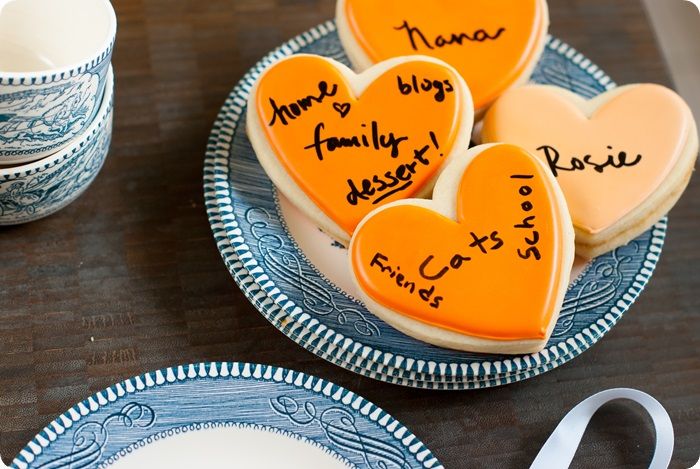
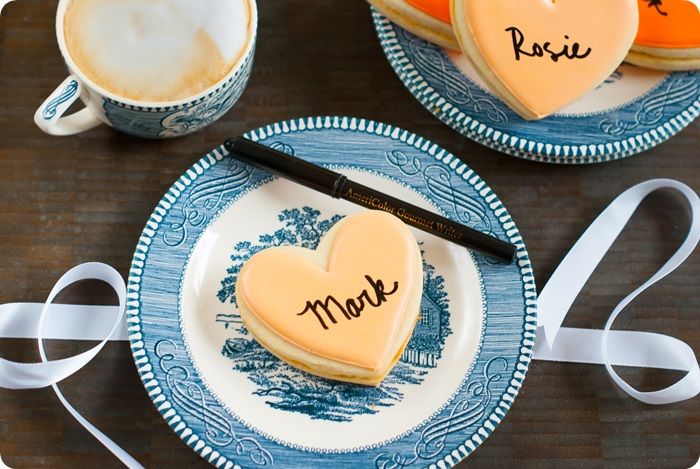
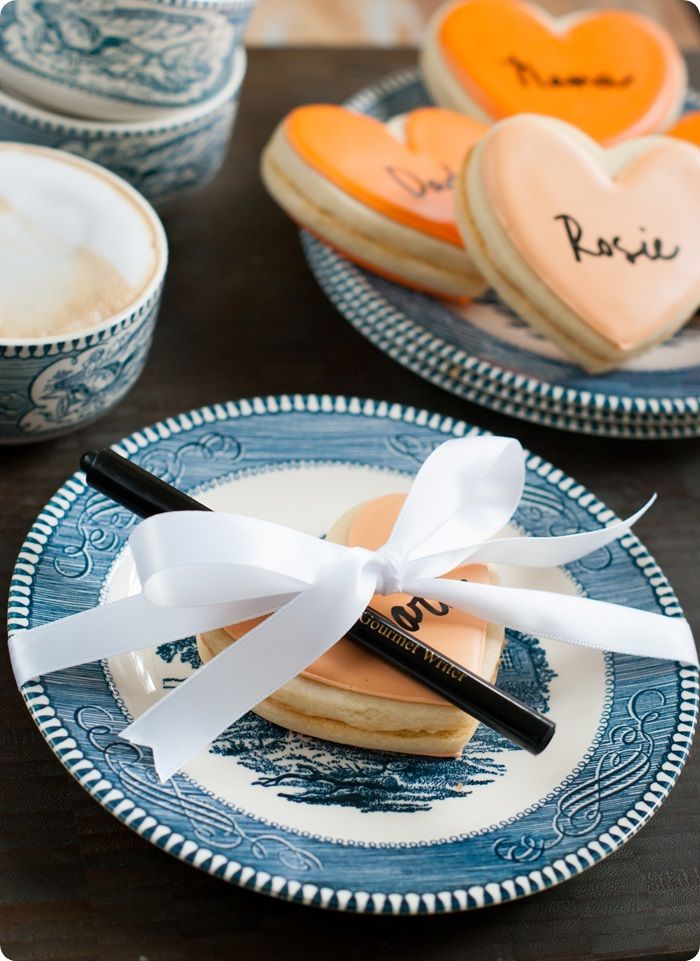 On one side, you write each guest's name. Then, give them a food coloring pen and let them write what they're thankful for on the other side.
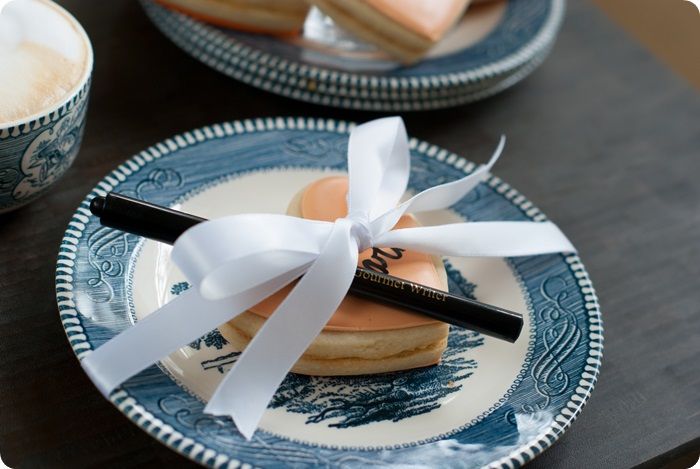


.jpg)


